

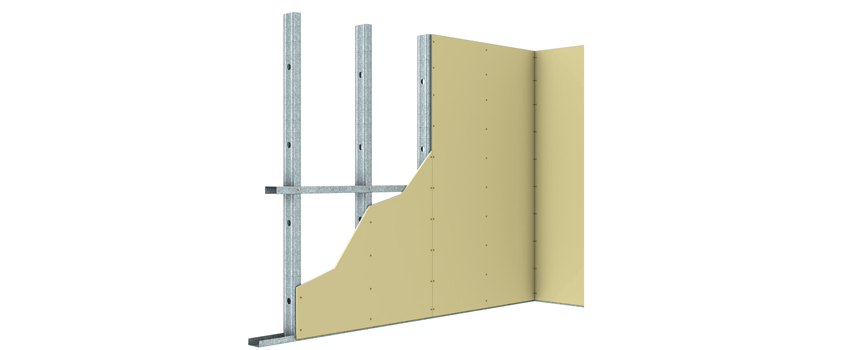
Not sure how to read a Rondo chart? We have put together a step by step example below on how to read a wall chart but before we get started, there are a few things you need to determine:
- The overall wall height;
- Thickness of the plasterboard to be used;
- How wide your wall is required to be (an average internal wall uses 64mm steel studs);
- If the wall will be lined on one side or both sides (the “wall heights” are suitable for up to two layers of the nominated thickness).
N.B. Wall Charts are designed for a loading of Pultimate = 0.375kPa and Pservice = 0.25kPa.
Now for the example, using the Rondo Internal Non-Load Bearing Walls - L/240 Plasterboard including Fire Rated Maximum Wall Height Chart (see page 99 of our Rondo Professional Design Manual 2015):
A 3m (3000mm) wall is to be constructed with 1 layer of 13mm plasterboard on each side (lined both sides).
UNDERSTAND
The most common spacing of wall studs is 600mm centres;
The most common internal wall thickness uses 64mm studs.
REMEMBER
Studs are not all the same price.
NOW
- Identify the set of numbers for “Single Studs @ 600mm centres” note the top section is for “Lined Both Sides” so using the line for “1 x 13mm” read across from this point until you find the closest number to the 3000mm of this wall but over your wall height not under.
- The first column of 51mm studs will meet your requirements but you don’t want a wall that narrow.
- The next column shows a 64mm x 0.50BMT stud will reach 3720mm height.
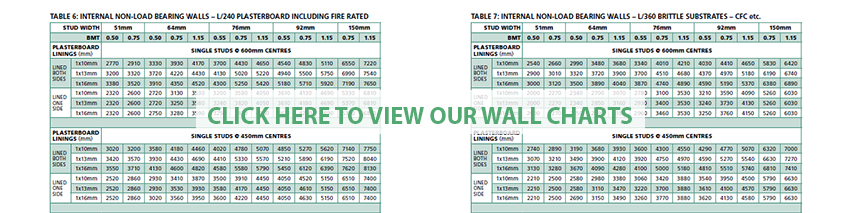
So, given that this stud size is the most commonly used stud, that is your answer.
You can see by reading down the same column that by closing-up the stud centres with 1 layer of 13mm board both sides you can increase the wall height.
Therefore, if your job has wall heights that vary you can save cost by using the same Stud & Track throughout the job, closing up the stud centres for higher walls.
Nogging requirements can also be found in our Rondo Professional Manual and through our online design wizards .
For a visual demonstration on how best to use Rondo’s Charts see below:
So now you know how to read our charts properly, but why should you?
Well if you don’t, you could be playing Russian Roulette with your reputation.
Here’s why -
1. The system may not perform as intended - if you pair a Rondo Wall Chart with someone else’s product, your system may not perform as it should and this could jeopardise safety.
PLUS
What you see isn’t always what you get. While some imported or locally manufactured ceiling/wall products may look like Rondos’, they could have a reduced zinc coating thickness which means they are less resistant to corrosion and therefore may not perform as intended.
AS A RESULT
2. Safety of others could be jeopardised – If the system doesn’t perform as it should then safety of building occupants is at risk. Today more than ever we should be aware of this fact due to the recent events overseas.
AND
All major manufactures have their own installation guides and technical data as they have been calculated to fit their design and manufacture standards.
3. You will void your Rondo Warranty and have no legal backing from Rondo if something goes wrong.
The really good news is, if Rondo Wall Charts are used correctly not only will you have peace of mind and avoid unnecessary stress, you will be able to rest easy knowing that you have prevented any potential legal trouble and irrefutable damage to your reputation.

One of these charts is not like the other